The Resource Calendar is a graphical tool that is fully integrated with resource reservations. You can use the Resource Calendar to view bookable resources, and reserve facilities, equipment, and instructors. The Resource Calendar is the default homepage of the Facility Management module.
The Resource Calendar supports the Day view (default view), Week view, Grid View and Month view. The Resource Calendar displays resource availability for the selected resources in a single day or each day in a specified month.

The Resource Calendar includes the following main sections:

In the menu bar, you can:
Click the date picker to select a required day or month.
Switch between the Day view, Week view, Grid view and Month view.
Use the filters section to narrow down the resource list and select the required resources to be displayed on the Resource Calendar.
To save your view and filter settings and use them again in the future, click the Quick View dropdown to create or apply a quick view.
In the filters section, the following filters are available:
Center filter – All centers are displayed. If many centers are displayed, enter a keyword to search for the required centers. Note that centers set to ‘Prevent Future Use’ are not included in the Center list.
Resource Type filter – Facility, Equipment, and Instructor are displayed.
Facility Type filter – All configured facility types (except retired facility types) are displayed.
Event Type filter – All configured event types (except retired event types) are displayed.
Resource filter – all bookable resources that satisfy the filters above are displayed in the list. If multiple resources are displayed, then enter a keyword to search for the required resources. To add a resource to the calendar, select the checkbox for the resource. To remove resources from the calendar, unselect the resource. Up to 20 resources can be selected to be added to the calendar. To increase the maximum number of resources, contact the ACTIVE Net support team.
Facilities are denoted with an F icon
Equipment are denoted with an E icon
Instructors are denoted with an I icon
For filter dropdowns with a search field, you can enter the criteria to search for required options.
For filter dropdowns that do not have a search field, the required options are applied to filter the resources.
You can also use the keyboard to operate the dropdowns:
To move the cursor to a required dropdown, press the Tab key.
To open a dropdown, press the Space key.
To locate an option in the dropdown, press the Up or Down keys.
In an opened dropdown, to quickly locate an option, press the required character key. For example, if the Center filter has centers A01, B02, and C03, then pressing the C key will move the cursor to C03.
After selecting the required options, press the Enter key to close the dropdown. To discard the selected options and close the dropdown, press the Escape key.
To quickly clear all selected resources, click the Clear Calendar link. All selected filters and resources are cleared.
Note:
Your filter selections are saved automatically and will be applied the next time you open the Resource Calendar in the same browser session.
To save your selected resources as a quick view, click the save icon and enter a name for the quick view. You can save up to 300 Local and 300 Global quick views.
To create a quick view that applies only to the current user, select Local.
To create a quick view that applies to all resource calendar users, select Global. To enable users to create global quick views that can be applied to all resource calendar users, on the Administration Home > System Settings > System User Profiles > Change Profile page, grant the Front Desk - Resource Calendar - Global Quick View permission to the required user profile.
To apply a quick view, select the quick view from the quick view filter and the saved resources are displayed in the calendar.
Your filter selections are saved automatically and will be applied the next time you open the Resource Calendar in the same browser session.
The Resource Calendar displays the availability for the selected resources on a specified day or each day in a specified month. The Resource Calendar currently supports the Day view, Week view, Month view the Grid view.
The calendar displays one column for the resource. To view detail information for the resource, click the resource name. To remove a resource, hover the pointer over the required resource name and click X. Blank spaces denote available timeslots for reservations. If the resource is reserved, then the timeslot displays the basic reservation information. Hover on the reservation to view reservation details.

In the Resource Calendar > Day view, to configure the displayed time range, click the setting icon under the Center filter and select the required time range. The specified time range only applies to the logged-in user account and it is retained between logins.
The Week view displays the availability of the selected resources in a specified week. In the Week view, depending on the height of a reservation block, reservation information including the permit number, event name, customer name, number of attendees, permit status and reservation time may be displayed.

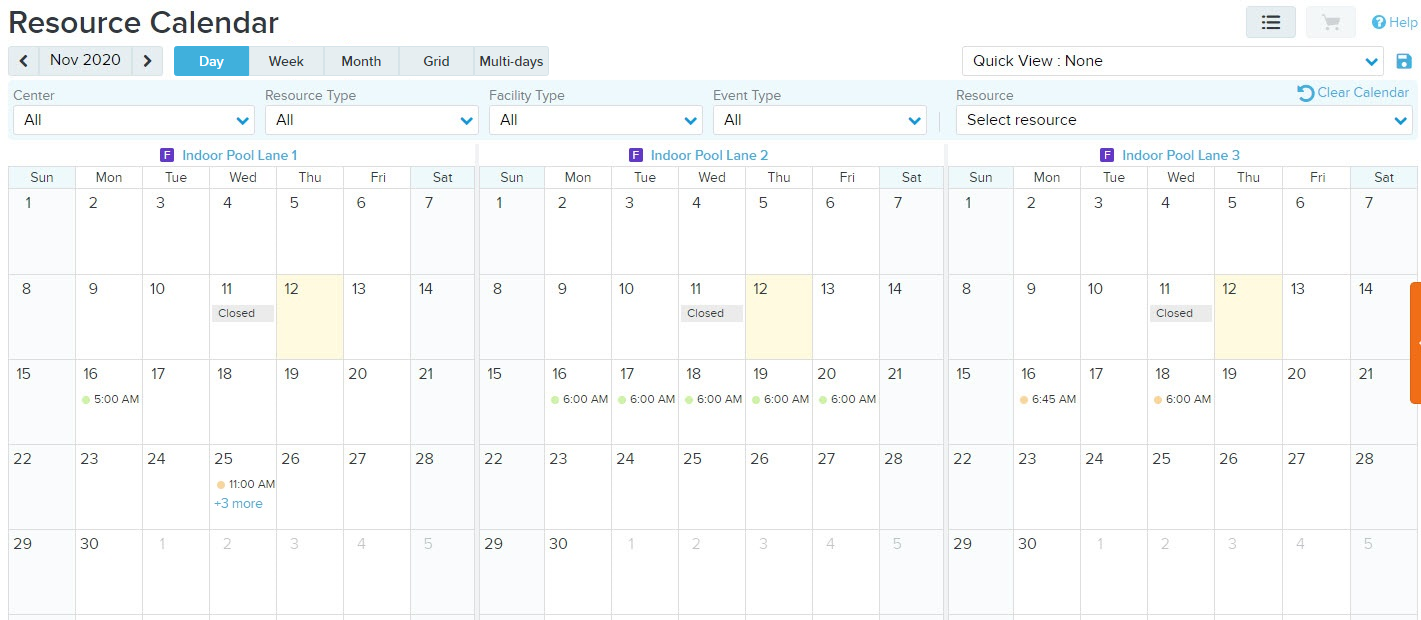
The Month view displays the selected resource availabilities in a month on a month calendar. On each day, the start time of the first reservation is displayed.
To view a list of reservations on a day, click the +X more link.
To view reservation details, hover the cursor over the reservation.
By default, selecting a time block creates a whole day reservation. Staff users can then adjust the time duration in the Reservation Information window. Note that the facility’s reservation configuration overrides this rule. For example, for a facility with the Maximum Reservation Time 2 hours setting, selecting a time block in the Month view creates a 12:00 AM to 2:00 AM reservation.
If you have added more than three resource, then to view additional resource, on the top right corner of the third resource, click the > icon.
Note that for Internet Explorer users, in the Month view, it is necessary for users to set the zoom percentage to 125% or greater. If users wish to use the Month view at a zoom percentage of less than 125%, then they must use Chrome or Edge browsers.
The Month view operates in a similar way to the Day view, except in the Grid view:
The positions of resources and dates are swapped.
Reservation blocks display only the permit number and the name of the customer who reserved the facility.
The Multi-days view operates in a similar way to the Day view, except in the Multi-days view:
The positions of resources and dates are swapped.
For a single resource, each day displays only reservation start times. If there are too many reservations, then only the start time of the first reservation is displayed; click the + more link to open the day view and view more reservations.
In the calendar, double-clicking the header of a date column opens the day view for that day.
By default, selecting a time block creates a whole day reservation. Staff users can then adjust the time duration in the Reservation Information window. Note that the facility’s reservation configuration overrides this rule. For example, for a facility with the Maximum Reservation Time 2 hours setting, selecting a time block in the Month view creates a 12:00 AM to 2:00 AM reservation.
The calendar displays one selected resource per column, and one hour per row. To navigate between resources and timeslots, drag the scroll bar or press the Up, Down, Left or Right arrow keys.
In the Resource Calendar:
Facilities are denoted with an F icon.
Equipment are denoted with an E icon.
Instructors are denoted with an I icon.
The calendar displays the availability of the resource on the day. Blank spaces denote available timeslots for reservations. If the resource is reserved, then the timeslot displays the basic reservation information. Hover on the reservation to view reservation details. You can double-click a reservation block (except reservations that are currently being created) to view or modify the reservation.
To color reservations in the calendar by event type or status (default), refer to the Administration Home > Facility Settings > Configuration page > Resource Calendar Settings section.
When coloring reservations by status, existing facility reservations and pending facility reservations for the current user are displayed in different colors.
Green blocks denote existing reservations (unavailable timeslots). To book these timeslots, your account must have the override permission. Reservations with the following statuses are displayed in green:
Completed
Approved
Issued
Orange blocks denote pending bookings. Click the Reservation Information icon to complete the reservation. Reservations with the following statuses are displayed in yellow:
Tentative
Waiting Decision
On Hold
Stage Denied
Grey blocks denote skip dates and closure times for the resource. To book these skip dates and closure times, your account must have the override permission.
Light purple blocks denote the reservations that are currently being created or modified in the Resource Calendar. When coloring reservations by event types, facility reservations are displayed in the specified color for the event type.
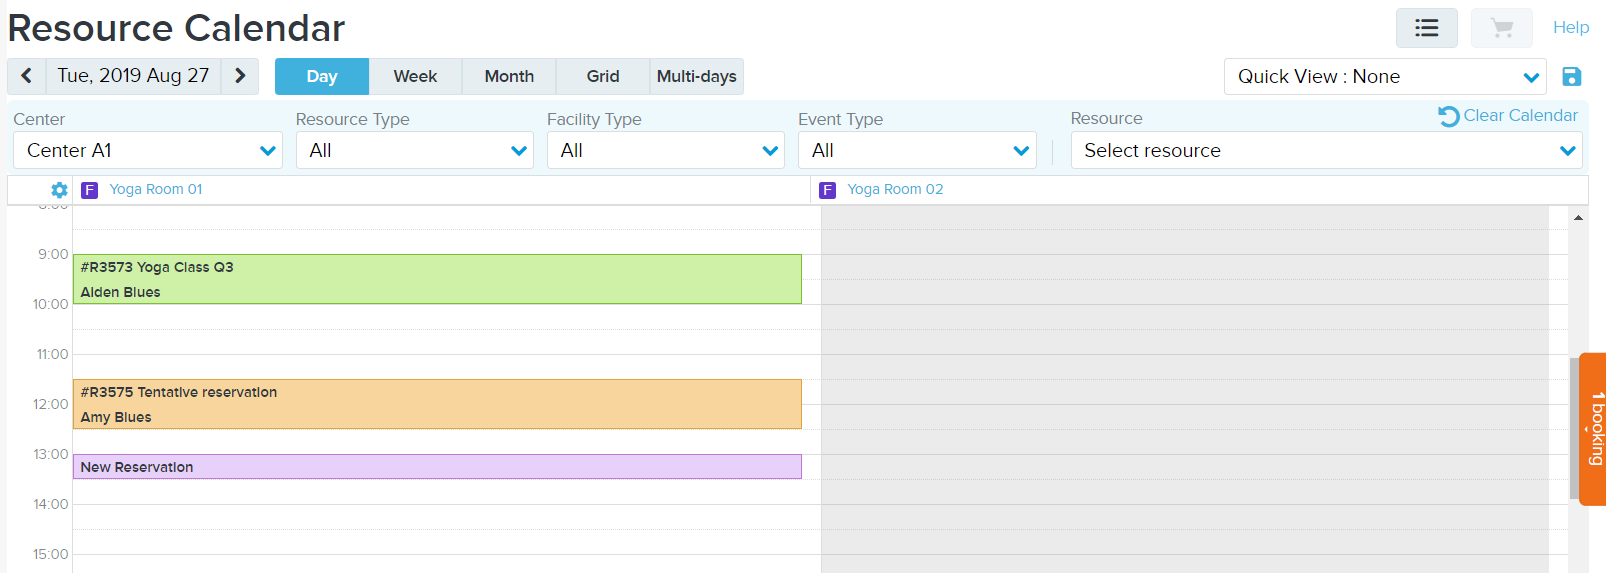
For example, on the screenshots for the day view and the month view, on Aug 27, 2019:
The Yoga Room 01 has a completed reservation (green), a tentative reservation (orange) and a new reservation that is being created (light purple).
The Yoga Room 02 is closed all day.