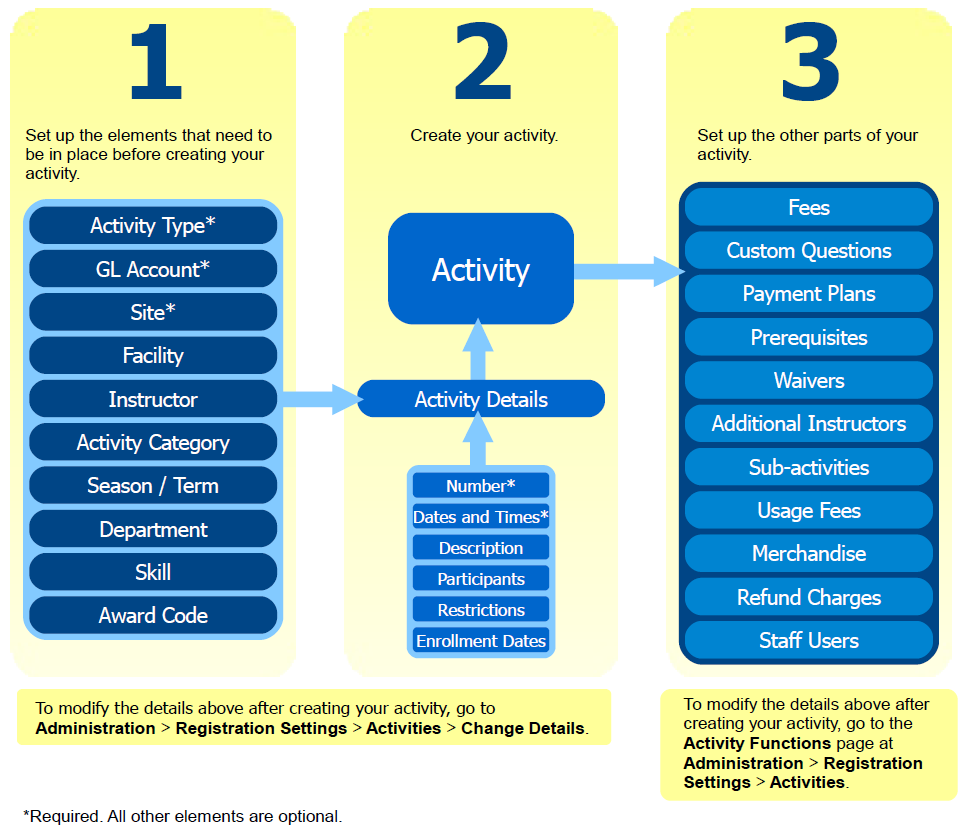
Activities are the courses that your organization offers for customer registration. Before you can create a new activity, you will first need to make sure that several other elements in ACTIVE Net are set up properly so that your activity can use them.
Click the links below to learn more about how to create an activity and enroll customers into it.

Ask yourself the following questions to make sure you are ready to create your new activity:
An activity's type determines the possible actions that are available for that activity. If it's not obvious which activity type your new activity should use, learn how to view the details of your existing activity types or make a new activity type, if necessary.
You will need to decide where you want the revenue for your new activity to end up for accounting purposes. Your organization will have its own way of grouping GL accounts: your policy might be to use a single GL account for many activities, or you might have a separate GL account for each activity. Learn how to view your existing GL accounts or create a new one, if necessary.
If the location of your new activity hasn't been finalized yet, you can create the activity without specifying a facility. Learn how to view your existing facilities or create a new facility, if necessary.
You can specify the instructor and/or the supervisor for the course either at the time you create the activity or at a later time. Learn how to view your existing available instructors in ACTIVE Net or specify new instructors, if necessary.
What department should I assign to my new activity, if any?
What activity category and/or activity other category should I assign to my new activity, if any?
What skills are associated with this activity, if any?
What award codes are associated with this activity, if any?
If your new activity is very similar to an activity that already exists, then the quickest way to get started is to make a copy of the activity that already exists and then make whatever minor changes you need to make to turn that copy into your new activity. Learn how to copy an activity.
Otherwise, create your new activity at Administration > Registration Settings > Activities > Add New. Learn how to create a new activity.
While you are creating your activity you will have the opportunity to specify all the information described in the section above, plus the following:
The activity's number.
The catalog description for the activity.
The activity's deferred revenue setting.
The site that the activity is associated with.
The activity's meeting dates and times (see note below).
The restrictions, if any, on who is eligible to enroll in the activity.
The minimum and maximum number of participants allowed for the activity.
The start dates for the activity's enrollment.
The other options for this activity.
Note: If you schedule your activity to take place at a facility that is already in use at that time, then some or more of your activity's dates may not be scheduled. If this happens, your activity will have a status of Date Conflicted and your customers will not be able to enroll in it until you resolve the conflict. After you create your activity, make sure you check your activity's status on the Activity Functions page at Administration > Registration Settings > Activities to make sure it is not Date Conflicted.
Once you have created your activity, you can do more activity configuration from the Activity Functions page (Administration > Registration Settings > Activities). Ask yourself the following questions after creating your activity to see if you need to do any further setup before starting enrollment:
Learn how to add a fee or discount to your activity.
Learn how to add custom questions to your activity.
Learn how to create a payment plan for your activity.
Learn how to specify prerequisites for your activity.
Learn how to add checklist items to your activity.
Learn how to add more instructors to your activity.
Learn how to configure make-up classes for your activity.
Learn how to manage sub-activities for your activity.
Learn how to enable a usage fee for your activity.
Learn how to link merchandise to your activity.
Learn how to set up a refund charge for your activity.
When you've finished setting up your activity, you can start enrolling customers into it. Ask yourself the following questions to find out what type of enrollment you should use:
Learn how to enroll a customer in your activity.
Learn how to enroll a customer in your activity from a deposit.
Learn how to enroll a customer in your activity from a waitlist.
Learn how to transfer an enrollment into your activity.
Learn how to modify a customer's enrollment in your activity.
Once the activity has begun, you can enter customer and/or instructor attendance for your each of your activity's classes. Learn how to enter attendance for your activity at Front Desk > Registrations menu > Attendance.
Use reports to see registration numbers, names, and attendance for your activity.
To see the names of the customers who have enrolled in your activity, go to Reports > Registration Reports and select one of the Rosters:
To see registration numbers for your activity, go to Reports > Registration Reports and run the Activity Totals report.
To print out attendance sheets for your activity's instructors so that they can keep track of attendance for each class, go to Reports > Registration Reports and select one of the Attendance Sheets:
Want more information about ACTIVE Net, including our product knowledge base? Visit our ACTIVE Net Answers.